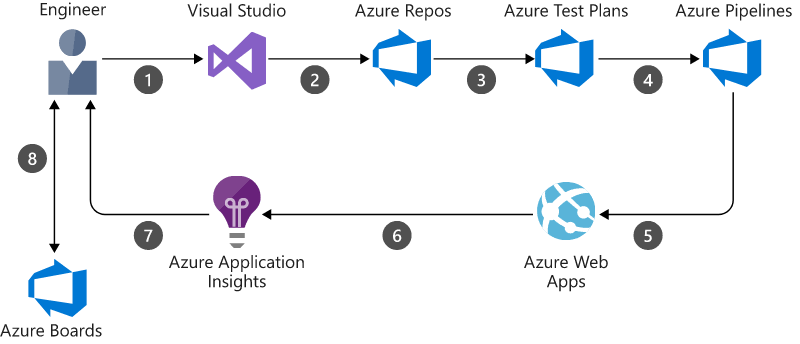
Azure Pipelines is a cloud service that is useful in automating build and testing the code project. It is implementable to any programming language or type of project. It supports languages such as C#, C++, Go, Java, Java Script, PHP, Python, Ruby, YAML and many more.
The consistency it brings in building and testing codes is due to continuous integration – CI and continuous delivery – CD. You can start coding with GitHub and GitHub Enterprise, GitLab, or using Azure Repos.
Azure Pipelines enables you to automate the build, test it, and deploy the code on various platforms such as Microsoft Azure, Amazon Web Services, and Google Cloud Platform.
A pipeline defines the continuous integration and deployment process made of either one or more than one stages of the applications. It is kind of workflow that defines how your test, build, and deployment steps are designed to function.
Features of Azure Pipelines:
- Integrated set of services
- Create an environment
- Accessible through all major browsers
- Add and manage work on your dashboard
- Easy navigation to various areas of the project
- Add new codes to your repository
- Build images for any repository
- Automate the builds
- Build projects across platforms
- Permits use of multiple versions of any programming language
- Customize CI triggers, and pipeline
- Collect code coverage metrics if build is on Windows platform
- Run tests on various versions of language
- Test on Android Emulator if hosted on MacOS
- Test on Azure-hosted devices
- Deploy to a virtual application, multiple web apps, or deploy conditionally
How to use Azure Pipelines?
Define the pipeline code in a YAML file together with the rest of the code created for your application.
Versioning of pipeline is section wise structure known as branching. This is uniform for all the coding you do. It can thus easily validate the changes, it reviews the code requests, and branch builds policies.
To modify the build policy you can simply modify the azure-pipelines.yml file of each section. Identification of issues is easier due to version control. Tracing and adapting right corrective action is possible with Azure Pipelines.
Stepwise guide:
- Use Git repo by Configuring Azure Pipelines.
- Define the build by editing azure.pipelines.yml file.
- Pushing the code to the version control repository by default builds and deploys.
- It examines the results of this complete process.
- Finally, build code is tested, and packaged for deployment to target.
Deployment Target:
Azure Pipelines are useful to deploy the code on multiple targets. These targets include Azure services, container registries, any cloud or on-premises target, and the virtual machines.
Concepts of Azure Pipelines:
Agent
An agent is software that you can install to run one job at given time form the multiple jobs. The system tries to run from your build and deployment with use of agent. At least, one agent is required to build and deploy the code on Azure Pipelines. There are different types of agents that run jobs on the host or container.
Microsoft-hosted agents can take care of the maintenance and upgrades. It can run the jobs directly on the virtual machine or in a container. With every pipeline run, you get a clean and fresh virtual machine.
Self-hosted agents are useful to manage and run jobs in Azure Pipelines or Team Foundation Server -TFS. It gives higher control to install the number of dependent software that is required for the builds and deployments.
Approvals
These are a definite set of validations, checked before performing deployment. Configuring checks in an environment is beneficial, as the pipelines will not deploy until all the checks are complete.
Artifact
It is a collection of packages or files published by a run relating to succeeding tasks of distribution and deployment. Each step creates some files that may be required for further deployment process. The build artifacts/files are downloadable and upload-able to external storage. These build artifacts are available for 7 days or till it reaches the size of 1 GB. The pipeline artifacts published does not allow transferring things from one job to the other. It saves time on downloading and uploading artifacts. The content uploaded is crosschecked with the pre-existing content in the services at file and sub-file level. Release and fix existing systems with automated release pipelines through these artifacts.
Continuous delivery
It is a process through which the code built is tested, and deployed. Testing is done in single or multiple tests and production stages. Maintain quality by deploying and testing using CD. The monitoring and alerting procedures run constantly impel visibility to this entire continuous delivery – CD process. This process identifies the errors at early stage.
Continuous integration
This system produces deployable artifacts for both the infrastructure and applications. Development teams practice CI for simplification of testing and building the code. Bug identifying is easier and fixing them is faster due to the help received from CI. It automates the tests and builds run as part of CI process. This process can run by fix schedule or as and when the code is pushed. Items produced from CI system are known as artifacts. These artifacts help in continuous delivery release pipelines. These pipelines handle automatic deployments.
Environment
It is a collection of resources where the applications are deployed i.e. virtual machines, containers, web apps, or any service used to host the developed applications. A pipeline might deploy the app to one or more environments after build is complete and running the tests.
Job
Each job run on an agent represents an execution boundary defined for a set of steps. One stage can execute multiple jobs via multiple configurations.
Run
It keeps log of the steps as well as tests run and represents the execution of a pipeline.
Stage
It is a rational boundary in pipeline for separating the build, QA, and production stages. The stage can contain one or multiple jobs.
Step
It can be a task or some script that will run in the build. Task is pre-scripted to simplify the process and add convenience to build and release tasks.
Trigger
It tells pipeline when to run based on trigger configured by you. It can also run on schedule or on completion of build.
Draw benefits using CI & CD in Azure Pipelines:
Continuous integration – CI: It increases code coverage and builds faster. Complete code is checked automatically and continuously to ensure quality.
Continuous delivery – CD: It automatically deploys code to production, ensures that the latest codes are available to the deployed targets. It uses tested code pulled from the CI process.
Azure Pipelines along with CI & CD deploys different targets at specific time and integrates Azure deployments. Create build on Windows, Linux, or Mac and integrate with GitHub. It works efficiently on open source projects too.
Begin creating first pipeline:
Fundamental readiness:
- You need a GitHub account for the repository you are about to create.
- Get the Azure DevOps organization, which is dissimilar to the GitHub organization.
- Both GitHub account and Azure DevOps organization, are available free of cost just by registering.
- Store the source code in version control system.
- Give yourself administrative rights of the Azure DevOps project for better control.
- Install Azure CLI 2.0.49 or latest
Use Azure Pipelines to build apps written in any programming language. If you are using Java junction the repository to your GitHub account on (https://github.com/MicrosoftDocs/pipelines-java).
Run Pipeline:
- Sign in to Azure DevOps organization and navigate to the project you created.
- From project navigate to the Pipelines page and click on create new pipeline.
- Select GitHub as location of the source code.
- If it redirects to GitHub then sign in to view the list of repositories.
- Select one sample app repository.
- Azure Pipelines analyzes the repository to recommend a Maven pipeline template from the list.
- Save and run the template, opt for Commit to master branch, then repeat Save and run.
- This is your new run, wait until it finishes.
Status badge for the repository:
Developers can tag the code quality and displaying the status badge e.g. successful. Display it from Azure Pipelines page view. From list of pipelines, select the one you created and want to add badge. The badge status copied to the clipboard is usable from the context menu of the pipeline. Copy this sample to the Markdown from the status badge panel.
Guidelines to apply badge in GitHub:
- Surf the list of files then select md.
- Edit file and paste the status badge Markdown at the beginning of the file.
- Then commit the change to the master
- The status badge will appear in the description of the repository.
With the changes made to the Readme.md file in repository, Azure Pipelines will automatically build your code. It will match code with the configuration in the azure-pipelines.yml file. A new run appears for every edit and starts a new run in Azure Pipelines.
Configure in any language such as Java, .Net Core, Node js, Python or any other after you create Azure Pipeline.
Final Thoughts:
Azure Pipelines components help in exploring the methods to deliver, quality code. It increases efficiency and reliability. You can customize the pipeline and even change the platform of build. Create build across multiple platforms or use multiple versions and run parallel jobs. Advance features and workflows bring substance to multi-phased builds.


