Angular stands as a cornerstone in the world of front-end development, renowned for its prowess in crafting robust single-page applications (SPAs). Its modular architecture and an array of tools serve as a foundation to streamline the development process. However, developing a scalable Angular application requires a thoughtful approach to code organization and architecture.

In this blog, we’ll explore eleven essential best practices that can significantly enhance the maintainability, readability, and scalability of your Angular projects. These practices, ranging from code structuring principles to naming conventions and recommended code extensions, are designed to streamline the development process and facilitate collaboration within a team. By sticking to these practices’ guidelines, developers can create robust and scalable Angular applications that are easy to understand, modify, and extend.
Let’s dive into these best practices and learn how to implement them effectively in your Angular projects.
11 Best practices to build Scalable Angular Applications
1. Adhere to the LIFT Principle
L — Ensure that code is easy to locate.
I — Make it easy to identify code at a glance.
F — Keep a flat structure as much as possible.
T — Strive to stay DRY (Don’t Repeat Yourself).
2. Use Meaningful Names
- Give methods, variables, and parameters names that are easy to read and understand.
- Avoid using jargon or technical terms in names.
3. Follow Component Design Guidelines
- Start with properties followed by methods (Input(), Output()).
Group and sort them logically. - Avoid defining variables randomly; follow a structured approach for long-term benefits.
4. Create Smaller Functions
- Break down functions for easier readability and to understand their purpose.
- Consider breaking down functions with more than 10–15 lines.
5. Provide Clarity Through Code
- Aim to write self-describing code without unnecessary comments.
Replace technical terms with simpler naming conventions. - Use comments to explain why certain code is written or to highlight consequences.
6. Design Services and Components Thoughtfully
- Avoid adding complex logic to components.
- Keep components focused on receiving and sending requests.
- Limit complex logic in components to 2 to 5 lines; move more complex operations to services.
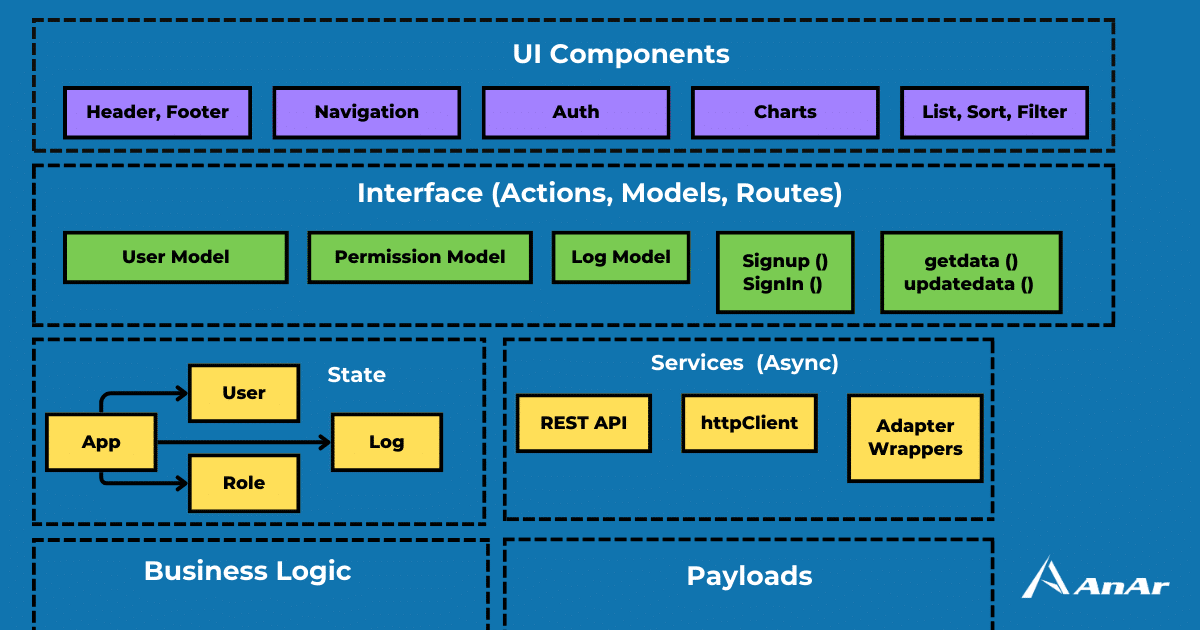
7. Embrace a Modular Architecture
Modular architecture is a pivotal element in the quest for scalability. Angular empowers developers to compartmentalize their applications into more manageable, bite-sized pieces through the use of modules. This not only improves code maintainability but also simplifies the process of adding new features.
Insight: Tools like Bit champion a modularity-first approach. By adopting this strategy, developers can independently store, test, and document atomic units of UI, allowing for a more scalable and maintainable app.
8. Lazy Loading for Enhanced Performanceery Based
Lazy loading is a clever strategy that ensures modules are loaded only when they’re needed. By implementing this technique, developers can significantly reduce the initial load time of their applications, thereby enhancing overall performance. Angular facilitates lazy loading through the use of the ‘loadChildren’ property.
Below is an example of a module:
import { NgModule } from ‘@angular/core’;
import { Routes, RouterModule } from ‘@angular/router’;
const routes: Routes = [
{ path: ‘’, component: HomeComponent },
{ path: ‘lazy’, loadChildren: () => import(‘./lazy/lazy.module’).then(m => m.LazyModule) }
];
8. Efficient State Management with Libraries — Static Based
As applications grow in complexity, managing their state can become a formidable challenge. State management libraries like NgRx or Akita step in to simplify this process. These libraries equip developers with the necessary tools to handle the state of their application, resulting in code that is both scalable and maintainable.
Below is an example of using NgRx:
// app.state.ts
import { Action } from ‘@ngrx/store’;
export interface AppState {
counter: number;
}
export const initialState: AppState = {
counter: 0
};
export function counterReducer(state = initialState, action: Action): AppState {
switch (action.type) {
case ‘INCREMENT’:
return { …state, counter: state.counter + 1 };
case ‘DECREMENT’:
return { …state, counter: state.counter — 1 };
default:
return state;
}
}
9. Leverage Reactive Forms
Reactive forms serve as a potent tool for constructing scalable and easily maintainable forms in Angular. They offer a declarative approach to form validation, enabling developers to build intricate forms with fewer lines of code.
Below is an example of using reactive forms:
export class LoginComponent implements OnInit {
loginForm: FormGroup;
constructor(private fb: FormBuilder) {
this.loginForm = this.fb.group({
email: [‘’, [Validators.required, Validators.email]],
password: [‘’, [Validators.required, Validators.minLength(6)]]
});
}
ngOnInit(): void {}
onSubmit() {
console.log(this.loginForm.value);
}
}
10. Component-Based Architecture for Reusability
Component-based architecture has become widely favoured in recent years for front-end development. It offers a pattern that is well-suited for building maintainable and adaptable code in the context of front-end applications.
The Angular app architecture outlined in this article emphasizes the importance of component-based design. The concepts discussed aim to boost the reusability of components, ultimately making applications more comprehensible and enjoyable to extend.
In our view, the key to creating highly reusable components lies in the distinction between containers and presentational components.
A. Presentational components
Presentational components have the duty of displaying the current state and creating an interface for user interaction within the application. They specify the appearance of the rendered state through their templates and style definitions. Additionally, they establish event listeners to manage the interactive aspects of their role.
Here’s an example with a “ProductCard” presentational component:
<!– product-card.component.html –>
<div class=”product-card”>
<img class=”product-card__image” [src]=”product.imageUrl” alt=”{{ product.name }}”>
<h2 class=”product-card__title”>{{ product.name }}</h2>
<p class=”product-card__description”>{{ product.description }}</p>
<button class=”product-card__button” (click)=”onAddToCartClick()”>Add to Cart</button>
</div> In this example
In this example, the ProductCardComponent displays a product’s image, name, description, and an “Add to Cart” button. When the button is clicked, it triggers the onAddToCartClick() method.
The associated component class might look like this:
// product-card.component.ts
@Component({
selector: ‘app-product-card’,
templateUrl: ‘./product-card.component.html’,
styleUrls: [‘./product-card.component.css’]
})
export class ProductCardComponent {
@Input() product: Product;
@Output() addToCart = new EventEmitter<Product>();
onAddToCartClick() {
this.addToCart.emit(this.product);
}
}
In this class, the ProductCardComponent receives a product as an input and emits an event when the “Add to Cart” button is clicked.
This example showcases a simplified product card component that can be used in an e-commerce application. It effectively separates the presentation of the product information from the logic associated with adding it to the cart.
B. Smart container components
Smart container components are like connectors that link observable stores and other logic with display components in a flexible way. They’re called “smart” because they need to understand how the app’s information is organized, which stores hold the needed data, and which methods to use when a display component triggers an action. These components are very specific to certain features of the app and can’t be reused as easily. However, this specialization is necessary for the app to perform complex tasks.
For instance, a container component class might look like this:
@Component({
templateUrl: ‘./coffee-list.view.html’,
styleUrls: [‘./coffee-list.view.scss’],
providers: [CoffeeListStore, CoffeeListEndpoint],
})
export class CoffeeListView implements OnInit {
constructor(public store: CoffeeListStore) {}
ngOnInit(): void {
this.store.init();
}
}
The crucial parts to note are the providers section which specifies the services needed, the constructor which creates a new instance of the observable store, and the this.store.init() which initializes the store.
The template of a container component is even more interesting:
<ng-container *ngIf=”{state$: store.state$ | async} as subs”>
<!– … –>
</ng-container>
Here, we’re creating an object called subs to manage subscriptions to different observable stores. This is a way to optimize subscriptions in the template.
This clear separation of responsibilities makes it easier to understand and add new features to the app. It also ensures that data flows in one direction through the app.
Lastly, there’s a special type of container component called a “view”. It’s like a smart container component that can be accessed via Angular Router. It’s responsible for synchronizing query parameters with the state in the app’s stores. This is important for keeping the URL and app state aligned.
For example, a view component might handle updating the state when a sort of query parameter changes:
export class CoffeeListView implements OnInit, OnDestroy {
private ngUnsubscribe$: Subject<undefined> = new Subject();
constructor(public store: CoffeeListStore, private route: ActivatedRoute) {}
ngOnInit(): void {
this.subscribeToQueryParamsUpdates();
}
private subscribeToQueryParamsUpdates(): void {
this.route.queryParams
.pipe(takeUntil(this.ngUnsubscribe$))
.subscribe(params => {
this.store.sortCandidates(params.sort);
});
}
ngOnDestroy(): void {
this.ngUnsubscribe$.next();
this.ngUnsubscribe$.complete();
}
}
In this example, the view component listens for changes in the sort query parameter and updates the store accordingly.
Additionally, views handle updating the URL when the state in the store changes. This ensures that changes in the app’s state are reflected in the URL. This helps maintain a consistent user experience.
11. One-way data flow
The one-way data flow principle stands as an effective pattern for ensuring uniformity of state across all components within the application. Its popularity surged thanks to React, but it’s important to note that this pattern isn’t exclusive to React-based applications. On the contrary, I would assert that employing the one-way data flow pattern is highly advantageous when developing front-end applications, regardless of the framework in use. Due to the unidirectional flow of data, it is straightforward to trace its path and gain a lucid understanding of the application’s functioning.
Conclusion —
In conclusion, the journey towards building a scalable Angular application is a multifaceted one, demanding a blend of techniques and adherence to best practices. By incorporating LIFT Principle, smaller functions, lazy loading, modular architecture, state management libraries, reactive forms, and a component-based approach, developers can forge applications that are not only more maintainable and performant but also infinitely scalable.